Making your personal website use SSL
The other day I received a email warning me that my website may not work for some people anymore because it does not use SSL. I gather that SSL encrypts the information passed between computers on the internet, making it more secure. For most people, it is the little lock next to the website name in your browser. Honestly, my knowledge here is limited, because I am not a web developer or security expert of any kind. Even my basic computer science knowledge is a bit ad hoc, since I learned tools to make scientific codes and figures, and only picked up other things as needed. Anyways, this process was a royal pain in the you-know-where. So I thought I would explain the steps I took for others who may be banging their heads in frustration.
First things first, some basics. I need to host this website somewhere, i.e., I need a place to put the text, links, and images that you are currently looking at. A lot of people choose to do this on Wordpress, Squarespace, Wix, Weebly, or another website builder. I like knowing and controlling how things work (and perhaps have a bit of a masochistic streak), so I decided to create the website from scratch and host it on Amazon Web Services (AWS). I do not have space to go into details here, but I use the AWS S3 Buckets to host my website.
I wanted to have an official looking URL (www.matthewwherman.com), so I bought this domain name through Namecheap because, as the title suggests, it was inexpensive. I link the URL to the AWS website directly, so when a web-surfer goes to my website, they are connected to the AWS hosting site through an unencrypted link. This is how things were set up until recently:
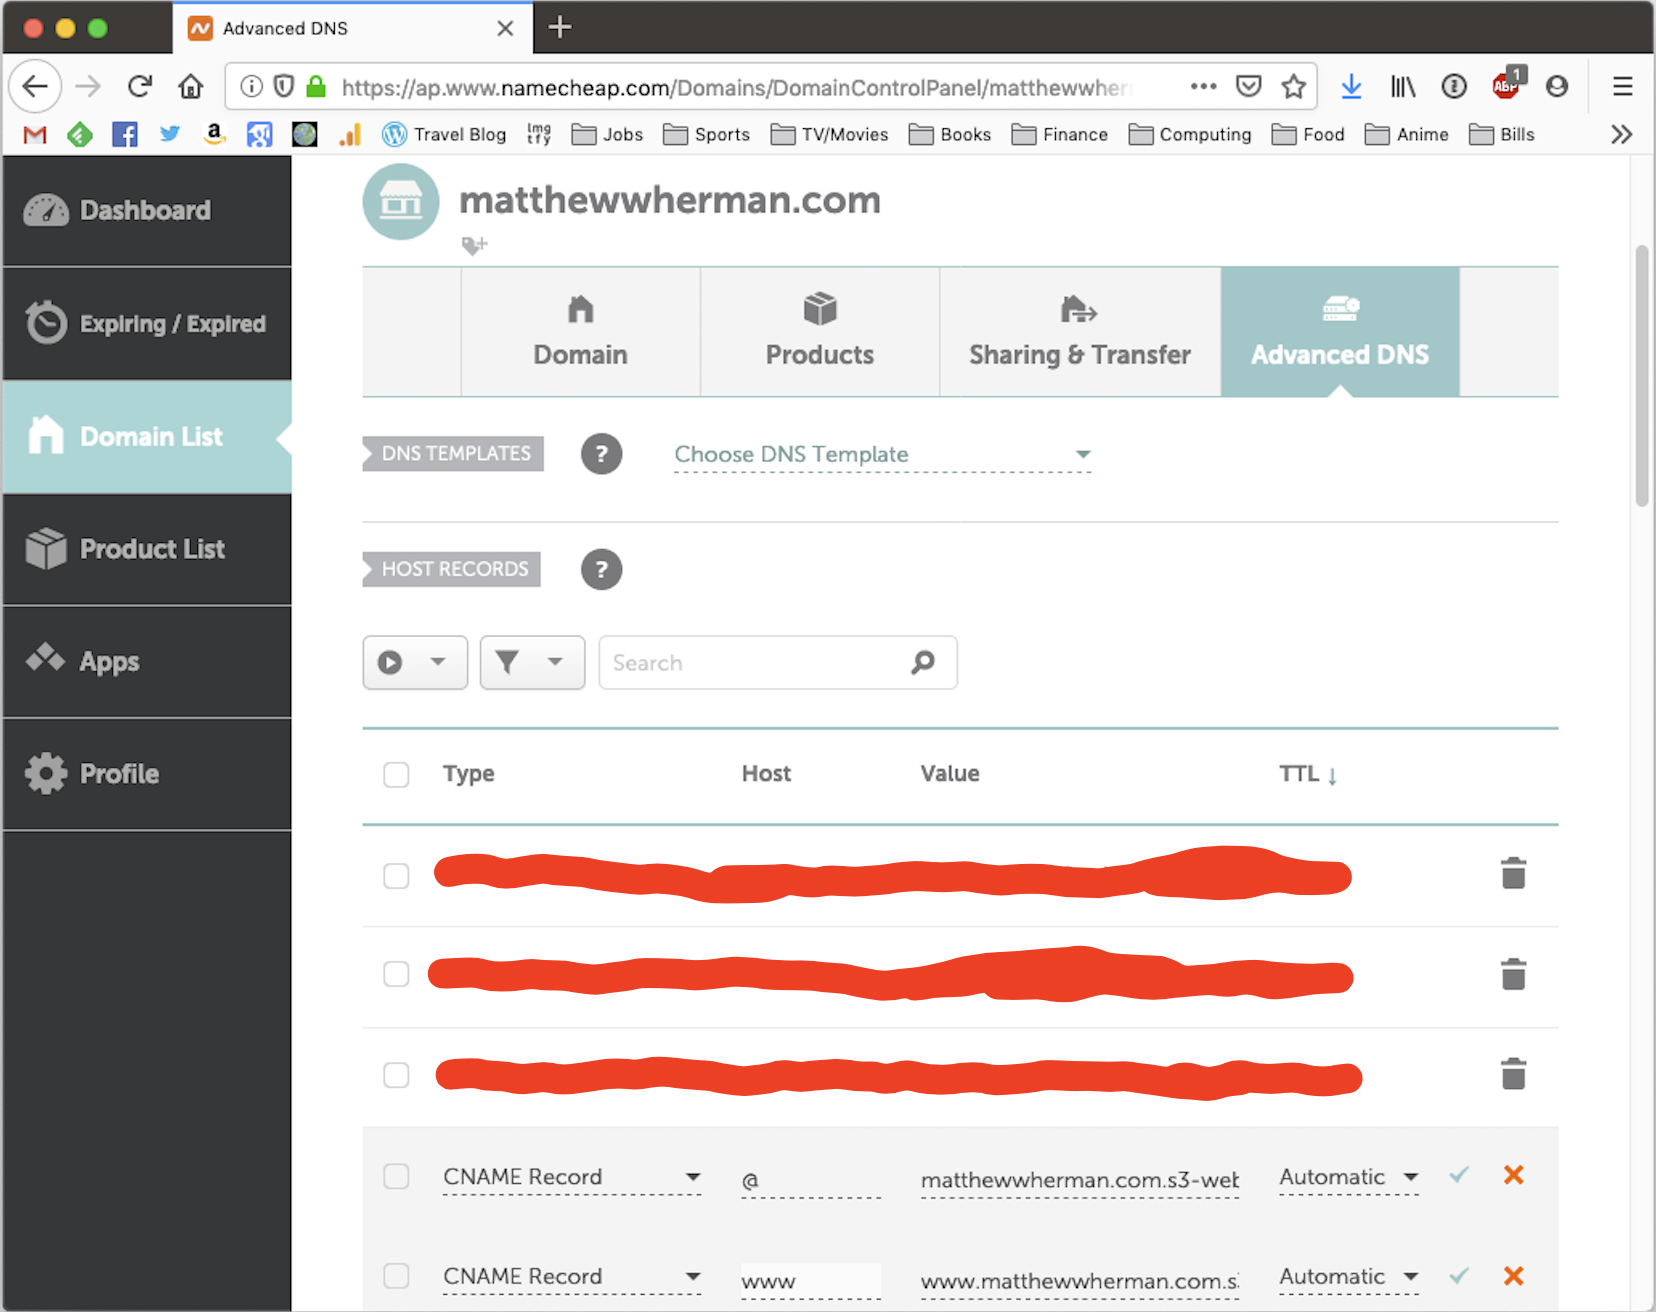
Here I am in the Advanced DNS tab of my domain on the Namecheap website. The CNAME record tells the interwebs when a user goes to matthewwherman.com or www.matthewwherman.com, load the AWS S3 Bucket containing the website (my domain followed by .s3-website....amazonaws.com; the AWS site is clipped in this image).
This link is not secure as shown, so I needed to make it secure using the SSL protocol. As I said, I do not quite understand the details here. What I know is that I needed an SSL certificate (containing an encryption key) and that it had to be incorporated this into the link between my domain name and my website. Since I was already using AWS, I decided to use their SSL certificate tool, so I logged into my AWS console, and went to AWS Certificate Manager (you can get there by selecting "Services" in the top left corner):
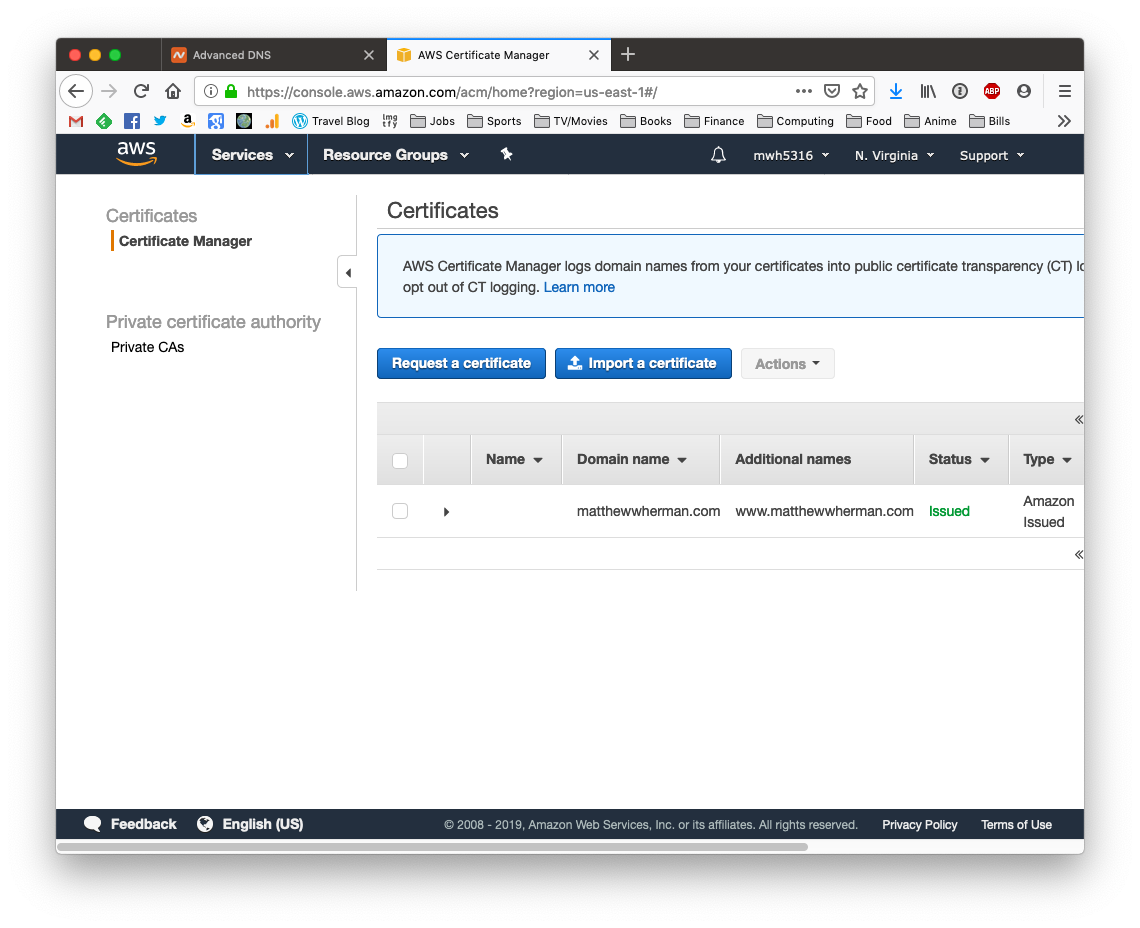
One thing that I learned the hard way is that it turns out to be important to specify which geographic region you issue the certificate in. So in the top right corner, where it says "N. Virginia," yours should also say the same thing. This will not work otherwise! You can see that my certificate is already issued and set up, but I will walk you through the process. This is one of the easier parts. Click "Request a certificate" (the blue button) to get started. Next, you are asked if you want a public or private certificate:
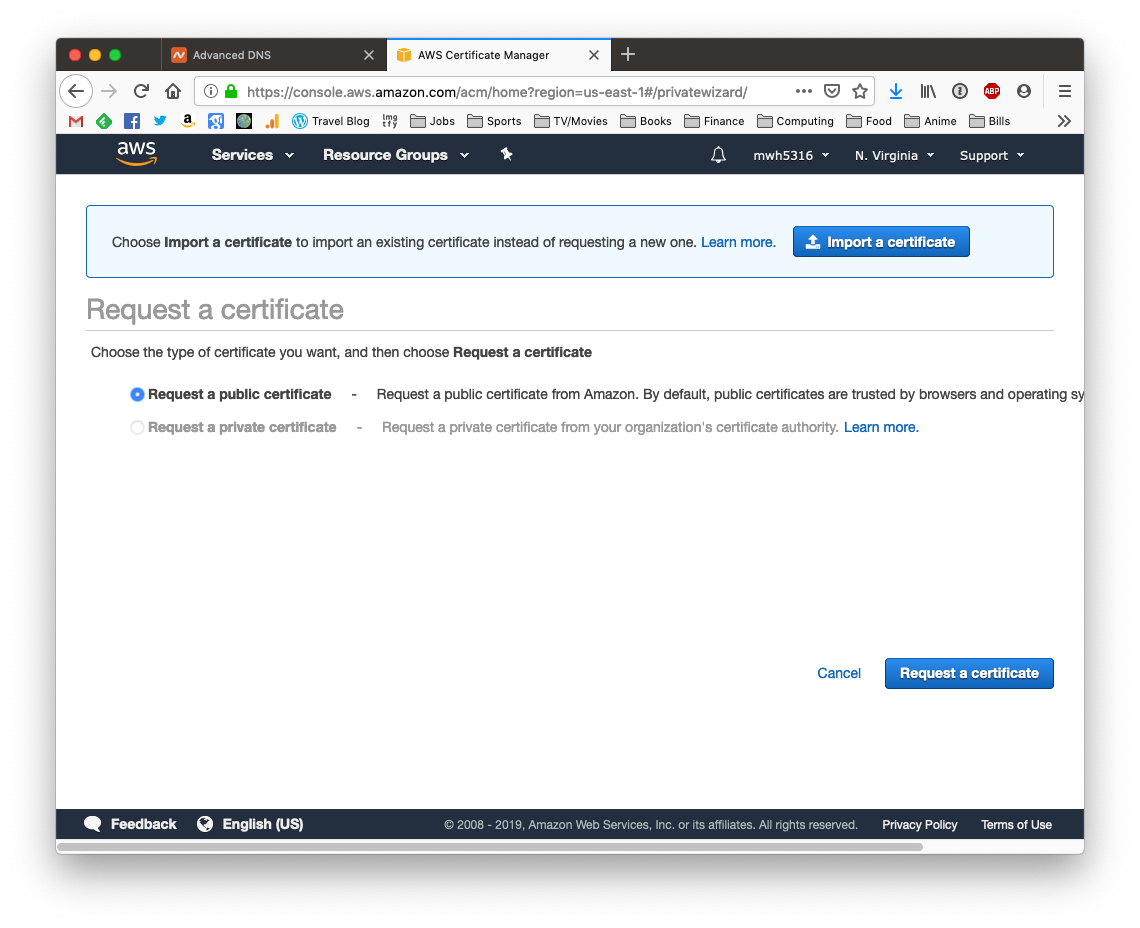
You want a public certificate, then click the "Request a certificate" button. Next, you need to define the domain names covered by the certificate:
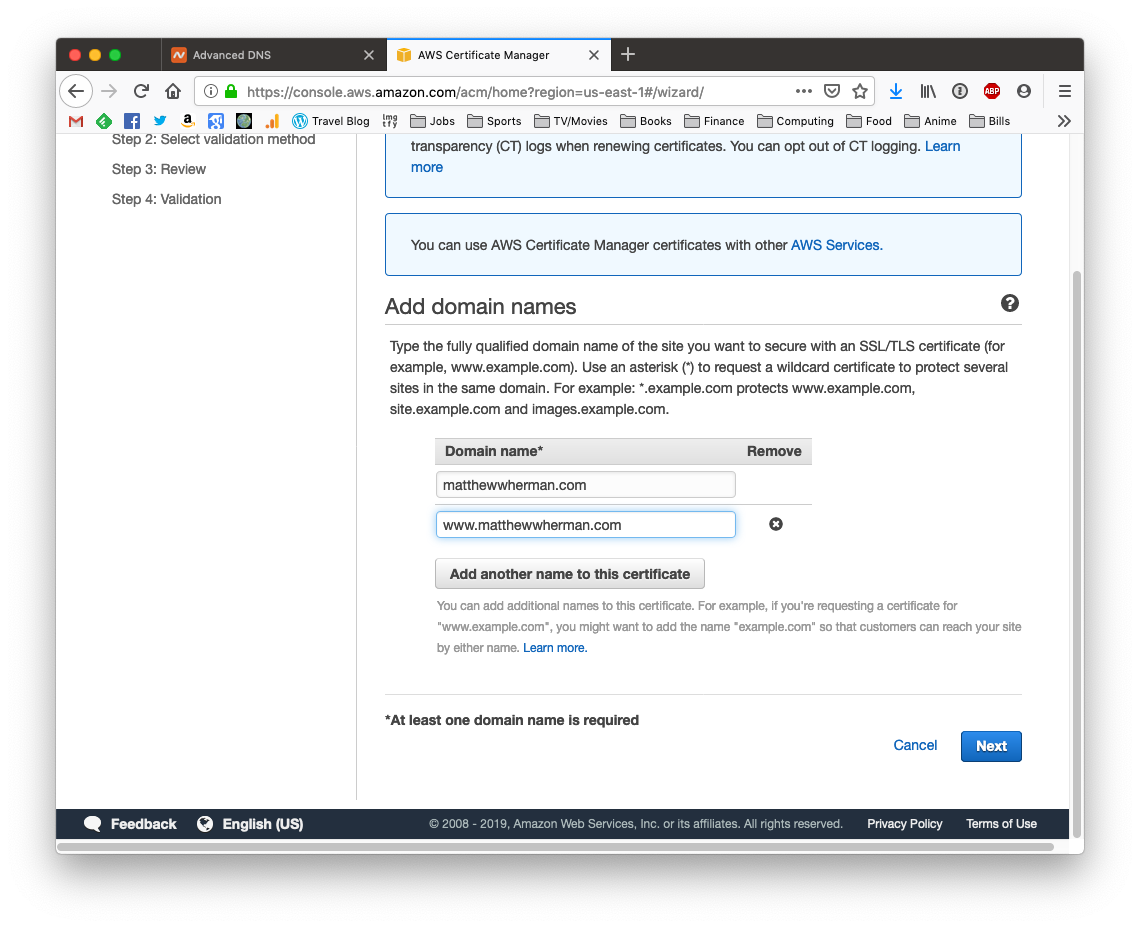
For me, the domain names that need to be covered by the certificate are "matthewwherman.com" and "www.matthewwherman.com." Click "Next" to continue. The last choice to make is DNS or email validation:
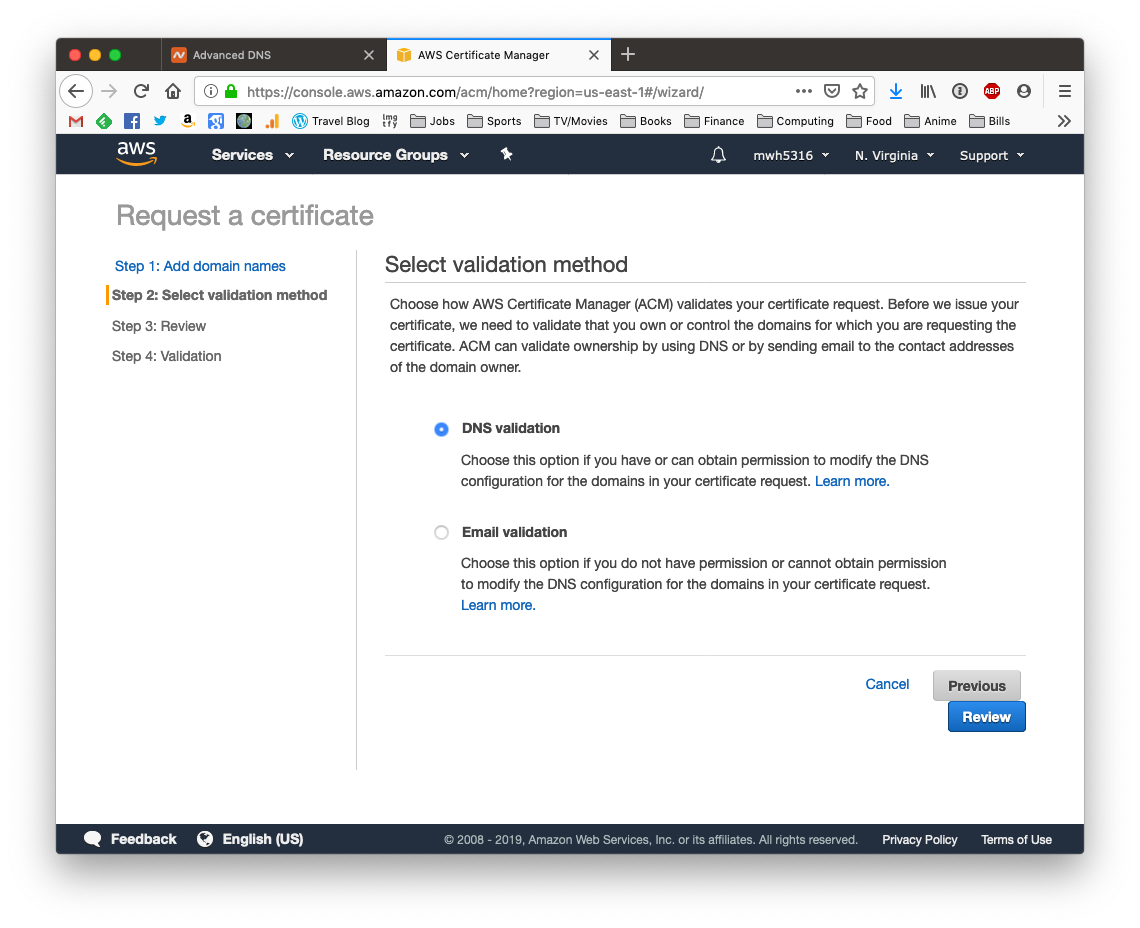
People online seem to prefer DNS validation. My understanding is that it has to do with the permanence of the certificate, but I do not know the details. The remaining steps assume you choose DNS validation.
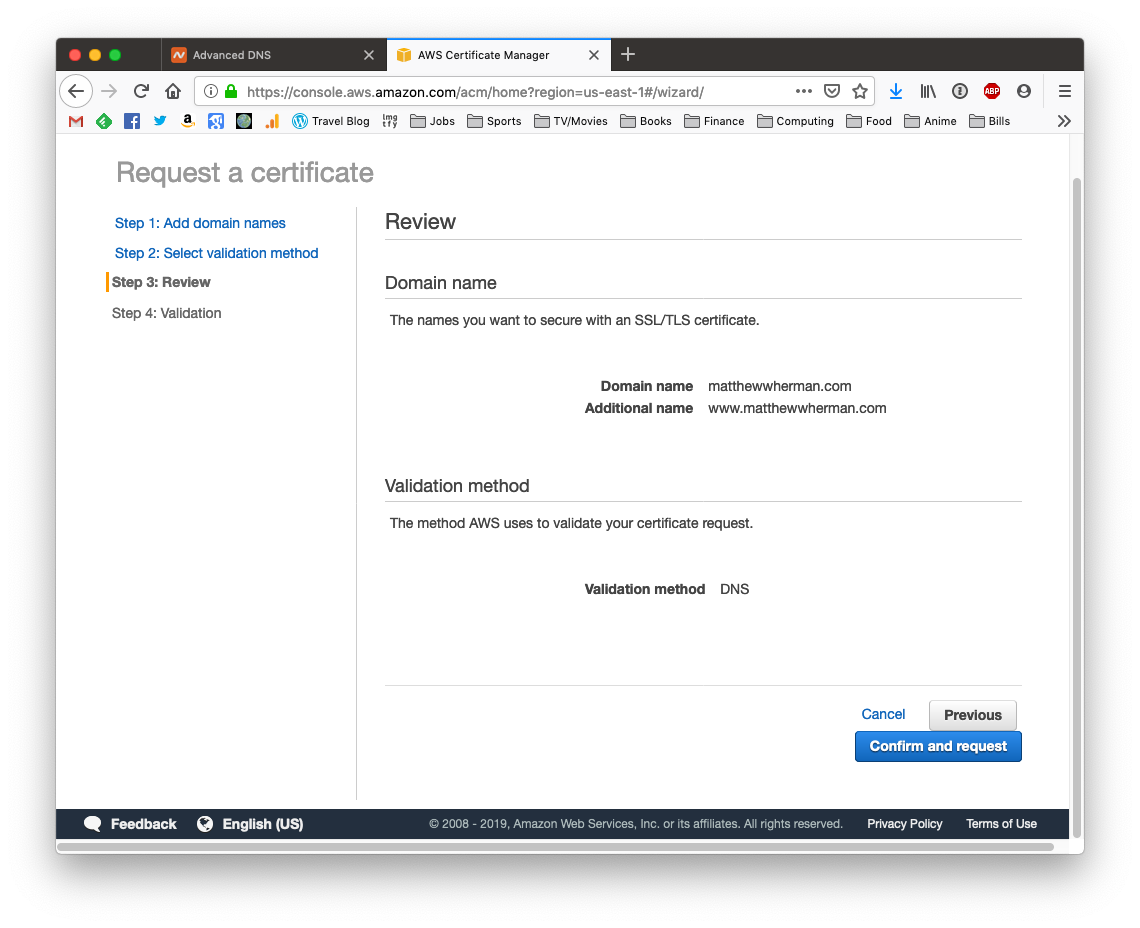
Finally, click "Confirm and request" to finalize the creation of the certificate. You will now see that there is a certificate made for your domain, "Pending validation":
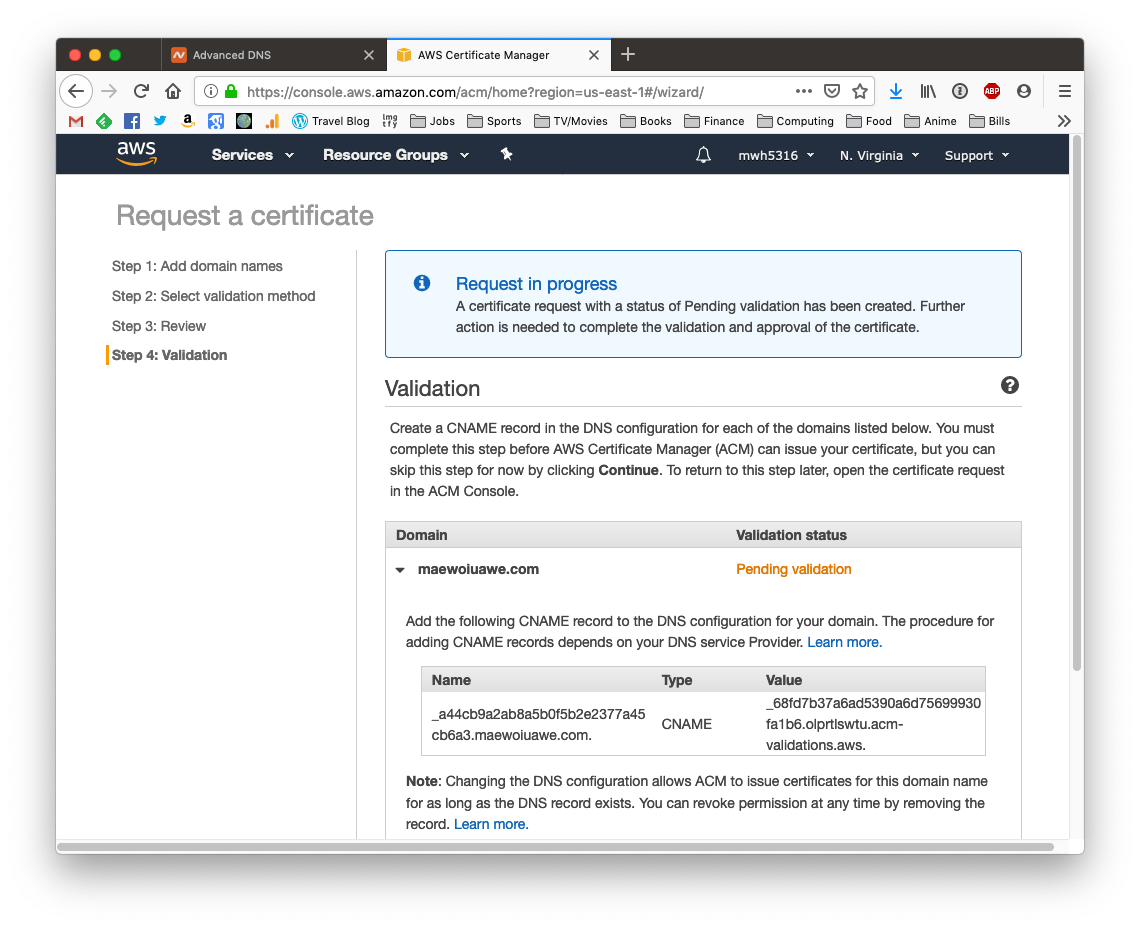
So you need to validate the certificate. Click on the website name to expand its description and you will see a complicated name and value. Again, not 100% sure what these mean, but I suspect that they are related to the encryption key in the SSL certificate. Practically speaking, the name and value need to be added to the place where you have registered your domain name. In this example, that is Namecheap.
So go back to Namecheap, click on the red "ADD NEW RECORD" button, and select CNAME Record. You will do this twice, once for "domain.com" and again for "www.domain.com." In the Host slot, copy the complicated Name from the certificate, but only including the characters before "domain.com" (this includes "www." for that URL). In the Value slot, copy the entire Value from the certificate. If this is done correctly, in a few minutes the certificate validation status will change from "Pending validation" to "Issued" and turn green. Yay!
The last thing to do is to actually use the certificate to set up the secure connection. I did this through AWS CloudFront and I have no idea if there is another way to set it up. Go back to AWS, click on "Services," and select "CloudFront" to access this service:
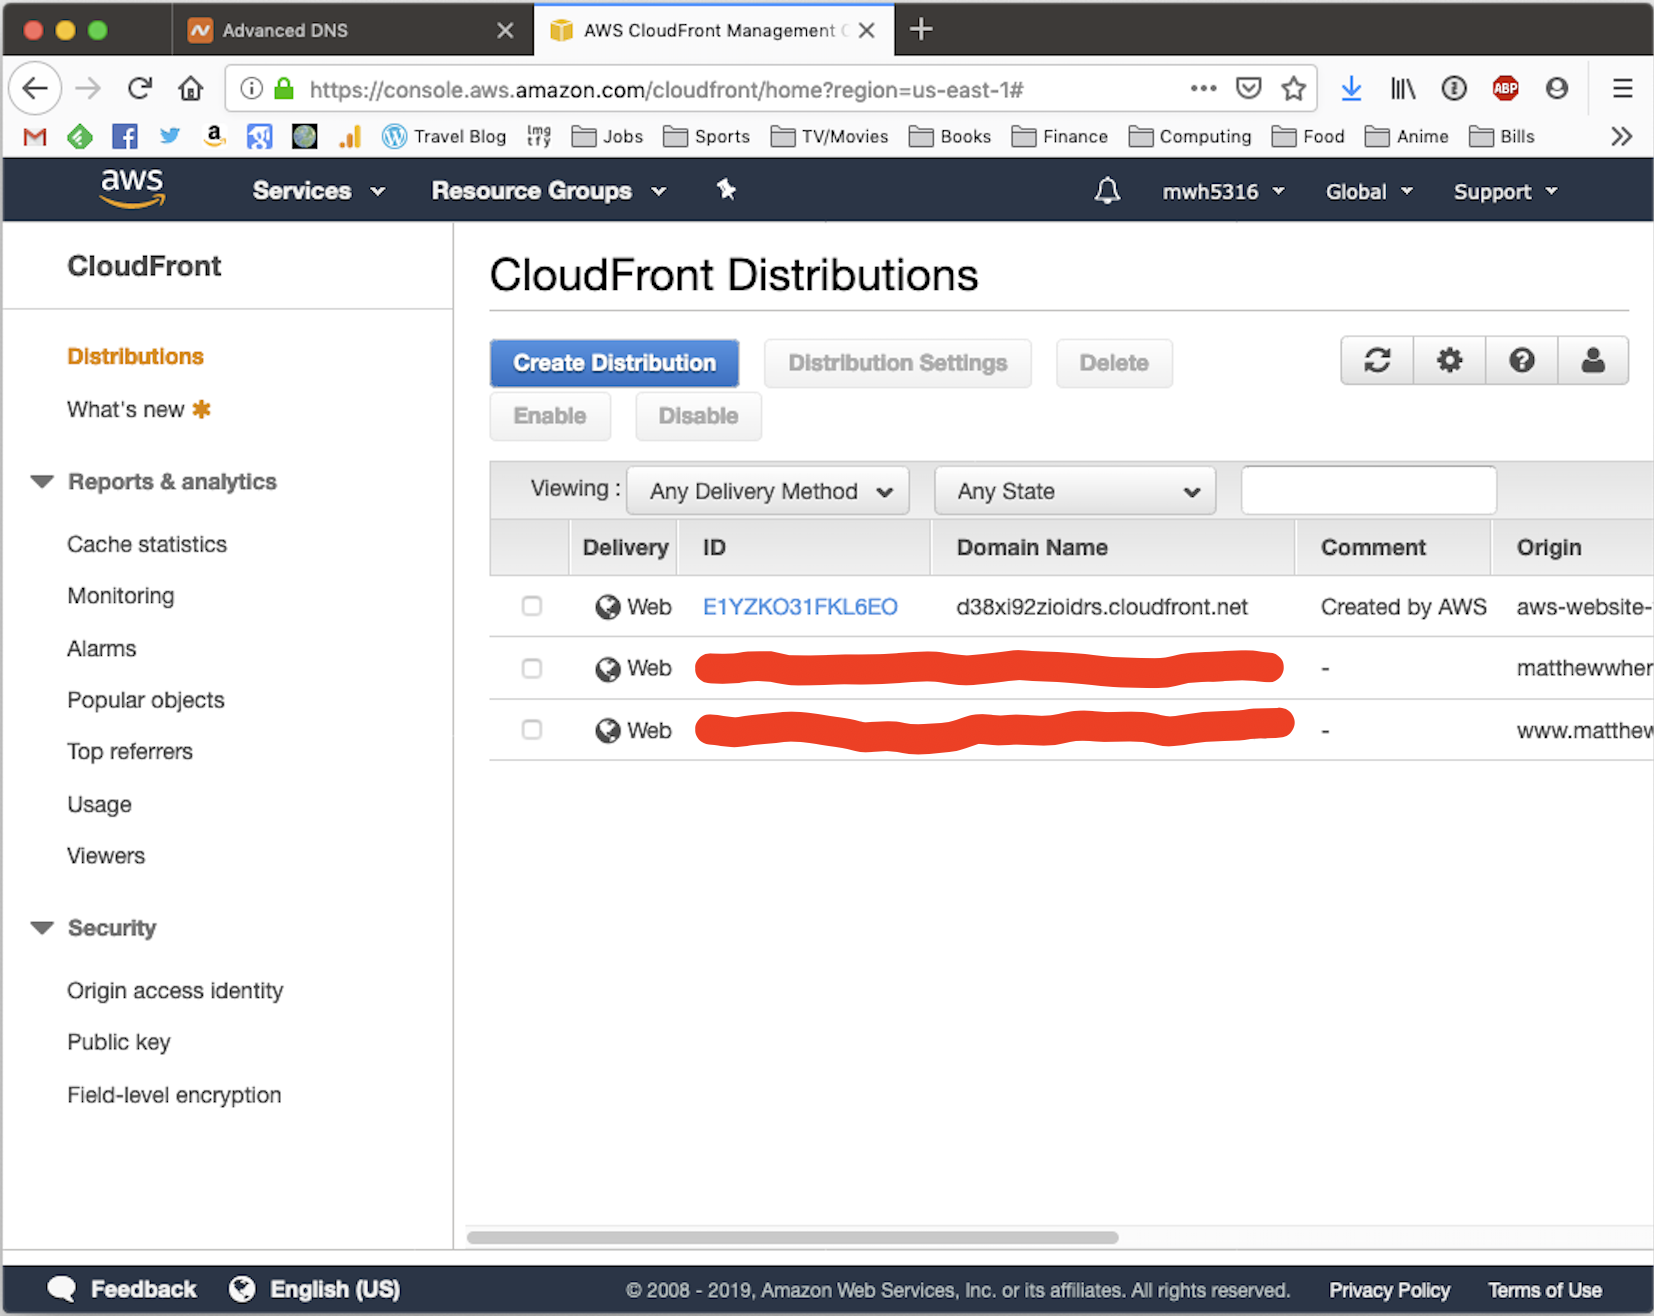
Once here, you will want to create two distributions, one for "domain.com" and the other for "www.domain.com." So click on "Create distribution" to get started. You want a Web distribution, so click "Get started" for that option. This takes you to a complicated page where you can set up a bunch of different options:
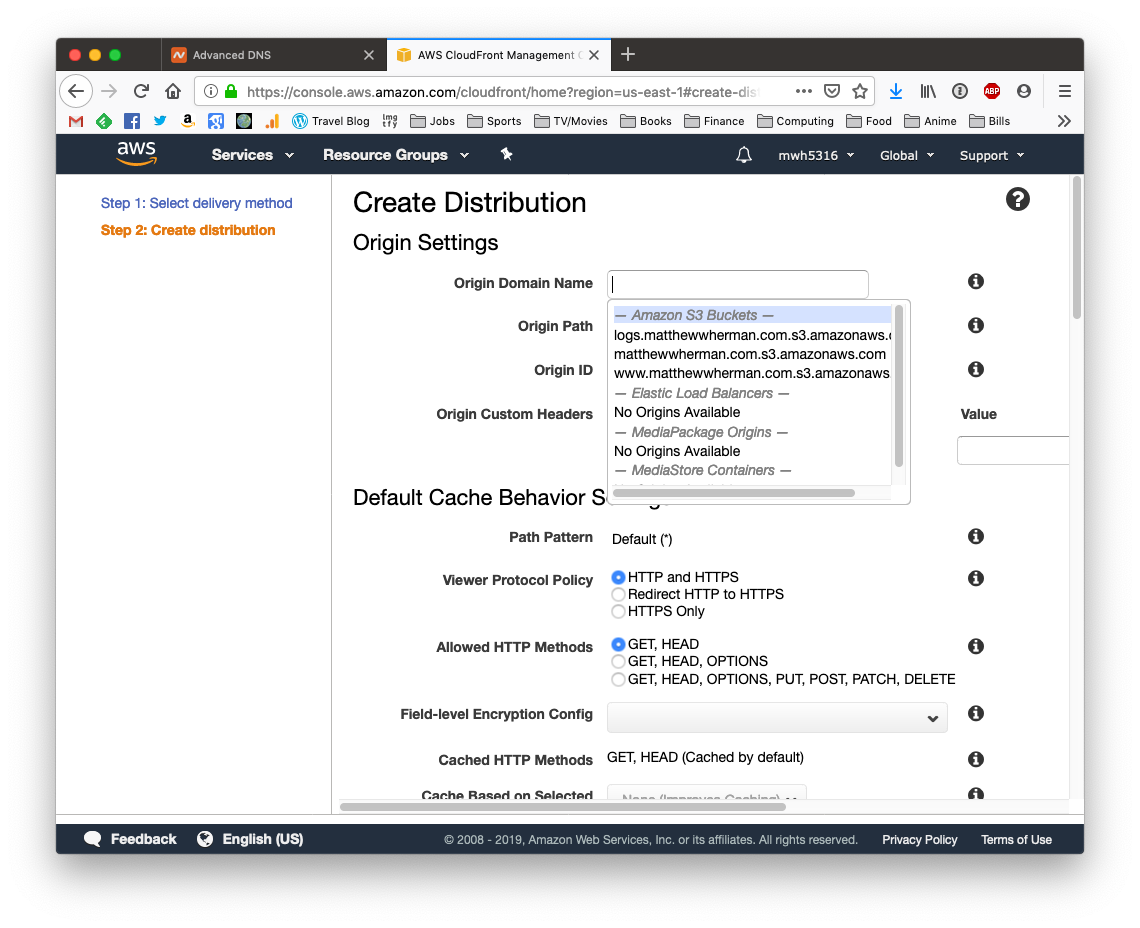
Fortunately, only a few of these are necessary to choose. In the Origin Domain Name, put the name of your AWS S3 Bucket where the website is hosted. Note that this is NOT one of the auto-complete options that is offered (as shown in the screenshot above). You should copy and paste your website ending in ....s3-website....amazonaws.com. Then select "Redirect HTTP to HTTPS" for the Viewer Protocol Policy. The Alternate Domain Names (CNAMEs) should be the simple name for the website (e.g., if you are making the distribution for www.matthewwherman.com, put that here). Finally, select "Custom SSL Certificate," put your cursor into the box, and the certificate you just made will pop up. Select this certificate and click "Create Distribution."
While the distribution is being deployed, there are a couple of things to finalize. You will see that each distribution has a Domain Name. Go back to Namecheap, and add two more CNAME entries, for the Hosts @ (domain.com) and www (www.domain.com). Copy the CloudFront domain names corresponding to these URLs into the Value slots here. This now points your website URL to the CloudFront distribution, which points (securely!) to the S3 Bucket hosting your website. Once the distribution is deployed, you should be all set.
Google and StackOverflow helped me a lot here. Good luck!
Giving a short scientific presentation
Back in 2018, I wrote down some of my thoughts about planning a 15 minute talk for the European Geosciences Union blog. These are good things to consider for any presentation you might give, whether at a meeting or in a class. Here are my opening thoughts:
At some point in your career as an Earth Scientist, you will hopefully have a chance to give a 15-minute talk at a meeting, a colloquium series, or simply in your lab group. This provides a great opportunity to advertise your hard work to your colleagues in an amount of time that is well within a human attention span. Ultimately, your goal in this talk is to effectively communicate your discovery to your audience. In the process, you get to explain the importance of your field, pose a crucial research question in that field, demonstrate cutting-edge analyses and applications, and, finally, provide an answer to that initial research question, sometimes for the very first time.
Despite all the latent potential for a 15-minute talk to captivate and teach the audience, many of these presentations end up being uninformative. I do not intend this as a judgment regarding the significance or quality of the science. I have seen incomprehensible talks from people whose research is crucial to our understanding of the Earth system. Alternatively, I have seen talks presenting incremental scientific advancements that were truly enlightening. But from all the diverse presentations I have seen, there are common elements that either dramatically improved or reduced my understanding of the subject matter. My aim here is to provide what I think are some of these key characteristics that make up a really excellent talk, so that next time you have the opportunity to present, you will inspire your audience.
And here is a link to the full post. Enjoy! I hope to see all of your improved presentations!